Publishing
Publish your project on the Google Cloud
You can publish your project on the Google Cloud right from your workspace.
Publish project
Click on Publish project in the File menu or click on the publish icon in the main toolbar of your workspace to upload your project to Google Cloud Storage.
By default your project will then be hosted securely from https://web.editey.com/<id>.
If you want to publish any changes, just hit the upload icon again on the changed file or on the workspace to upload all files again.
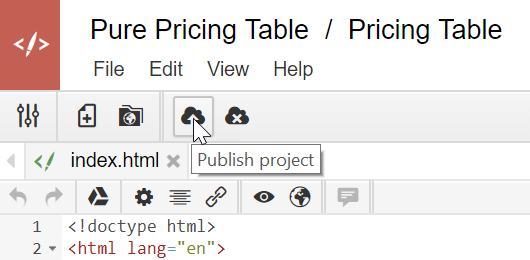
Once your project is published you can go to the published site at any time by clicking on the globe icon in the main toolbar of the workspace.
To serve your files from your own domain, read the Custom domains below.
Unpublish project
Just like publishing your project you can remove it from Google Cloud Storage by hitting the unpublish icon from the toolbar or by clicking the Unpublish project item under the File menu.
It may take a few hours until your project is deleted from the web as the site will be cached for better performance.
Custom domains
Editey makes it easy to server your project securely from your own domain.
Add custom domains
You'll have to add your custom domain to Editey and verify your ownership in order to be able to serve your project from your own domain.
Make sure that you have already registered the domain and that you have access to the DNS settings of the domain.
Either click on Add custom domain in the File menu or click on the red button in the publish dialog to add a custom domain.
A dialog will open and help you to verify your domain ownership.
First of all enter the name of the site you want to use.
Enter the full name including the subdomain, e.g. www.mydomain.com or myproject.mydomain.com, not just the naked domain like mydomain.com.

You can also specify the landing page that will be displayed when the users goes to your domain without specifying a page.
In our example the index.html file on top level will be opened when the user goes to https://myproject.mydomain.com
You can also specify a page that will be displayed whenever the user tries to access a URL on your domain that cannot be found.
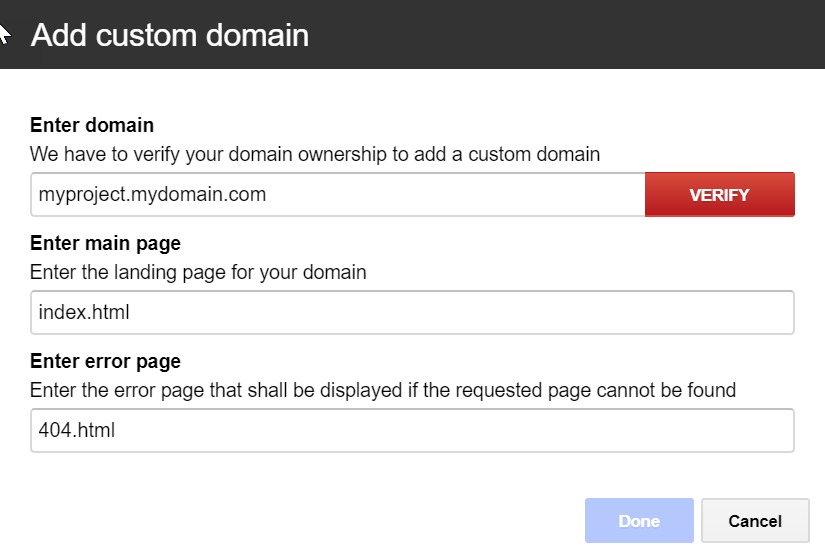
Click on the red Verify button after entering your domain.
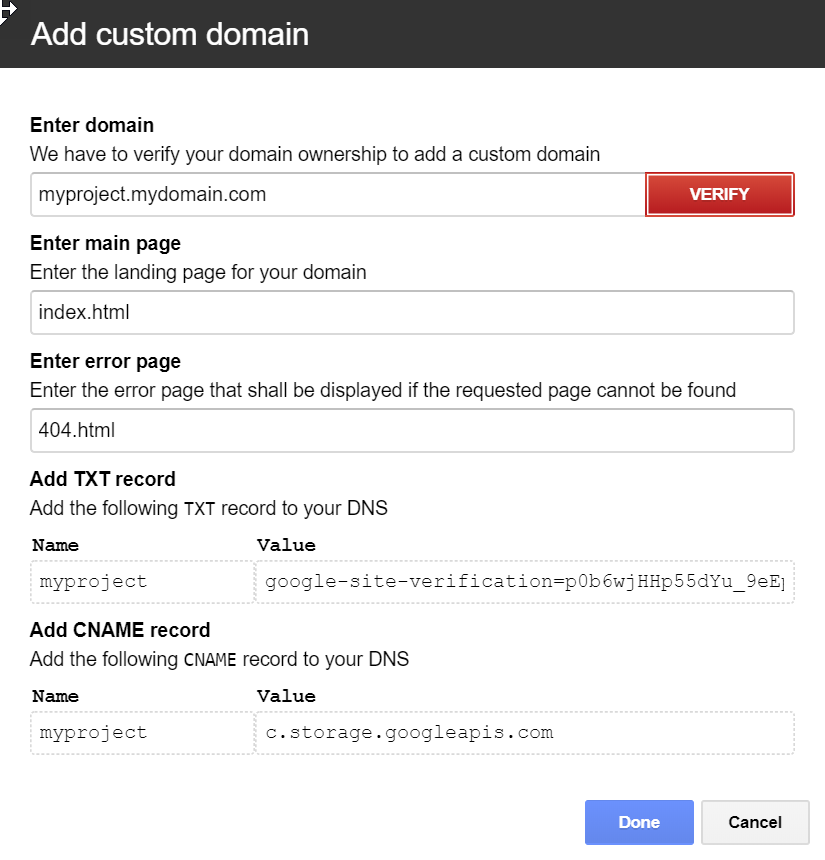
You will then find both a TXT record and a CNAME record that you have to add to your DNS file.
Use cloudflare to manage your DNS records and you will get a ton of additional cool features - including hassle-free SSL support.
To verify your domain using cloudflare, perform the following steps:
- Create an account on cloudflare. It's free for what we need.
- Click on +Add site and enter your naked domain name (just
yourdomain.comnotwww.yourdomain.com) - Cloudflare will then read your DNS records.
- Login to your domain provider and change your nameservers to use cloudflare's nameservers instead.
- Create a CNAME and a TXT record shown in the verification dialog.
- Activate cloudflare for the new CNAME record.
We are hosting this Editey documentation using Google Cloud Storage and cloudflare and for the help subdomain the CNAME record looks like this:

After adding the records click on Done to start the verification process.
Editey will then try to find the records in your DNS file to verify that you are the owner of the domain. This may take a while though.
Once the verification is complete, you will then receive an email indicating that the domain is ready to use.
The next time you publish your website you will then be able to publish to your shiny new custom domain!
SSL
When publishing your project to your own custom domain, Google Cloud Storage does not support https yet.
The good news is that you can serve your website via https by using cloudflare. This will not only speed up your website but it will also provide a free SSL certificate and is relatively easy to get started.
If you have added your custom domain as described in the previous chapter all you have to do is to switch your SSL settings in cloudflare to Flexible as this is the only setting that will work flawlessly with Google Cloud Storage.

It will take up to 24 hours to create your SSL certificate but then your project will be served securely from your own domain!
To serve all traffic securely create a page rule in cloudflare to redirect users trying to access your published project using http:// to https:// automatically.

Questions and Feedback
If you have any comments on this page, feel free to add suggestions right to the Google document that we are using to create this site.
If you are not yet member of the Edtiey community on Google+, please join now to get updates from our end or to provide feedback, bug reports or discuss with other users.
Last Updated: 30.09.19